
So Much Texture
72 Days Until I Can Walk
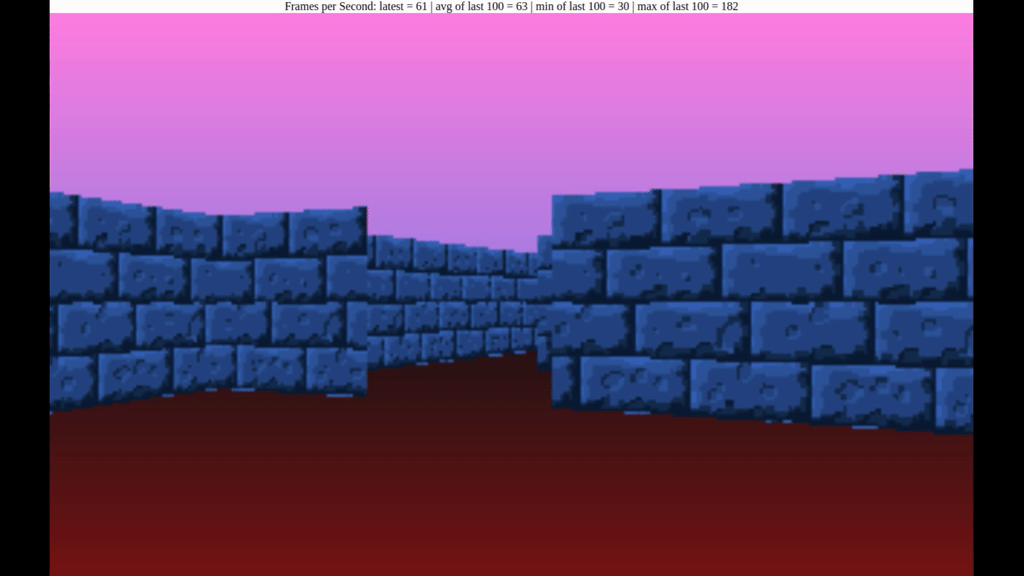
It’s the thirteenth day of the month, but it certainly hasn’t been unlucky. I’ve managed to get texturing working for walls. Now, while things are working, there is plenty of room for improvement, and I’ll dive into that over the coming weeks. But here’s a rundown of what was done.
Loading Textures
Long-term, I want to provide a level editor in the browser that you will be able to use to load your own textures and create your own maps. To that end, I wanted to come up with a way of loading textures that would make it as easy as possible for me to load new texture maps. What I decided to do was convert image assets into base64 encoded strings. Although this does cause the size of texture files to balloon, it at least gives me an easy way to load new textures from external sources.
What I am imagining is that users will be able to download their levels as JSON files with all texture information included as well. They will send these files to friends who can load them back into Fourteen Screws and play away to their heart’s content.
In order to make all this work, I implemented a new tool within the Fourteen Screws repository called img2tex. This gave me a chance to play around with Cargo’s workspaces feature, which was fun. Right now img2tex a png as input (the image must be rgba encoded). It strips away all the header information and retrieves only the rgba data as a Vec<u8> type.
Then I do something a little strange. In order to make it easier to index and stream the textures out onto the screen, I rotate them all by 90 degrees to the right. Then I reorganise the layout of the image so that each tile column immediately follows the one before it in the sprite. So, let’s say I want to access the third tile in the top row of the tilesheet below.

This tilesheet was created by Mutantleg games for their game LAB, and placed by them into the public domain on opengameart.org. I’ll be using these textures for texting for the next while.
Ordinarily I would have to index to the top-left corner, process that row (64 pixels), then skip down to the next row of the image, index in to the sprite again and process row and so on until the end of the tile.
By organising the image using my format, I can skip to the top of the first column of the third tile by indexing to \(3 * 64^2\) (Note: \(64\) is the width and height of a tile. So \(64^2\) is the number of pixels in a single tile). Now, I can read off the first column by processing the first 64 pixels I find there. When that’s done, the top of the second column of the same tile is in the next byte immediately following the last byte of the first column. No more indexing around, I can just stream through the texture.
This makes even more sense when you consider that we draw walls from top-to-bottom, not from side-to-size. So having our data laid out in columns is much more helpful.
With all of this done, I generated a base64 encoded string for Mutantleg’s textures and wrote them out to a JavaScript file called demo-level.js. I then imported this file in my Node application and passed it to the engine via JavaScript where the whole thing was parsed into a byte array and turned into textures in memory.
Applying Textures To Walls
Now that I had textures, I needed to apply these textures to walls. For projecting the image onto a surface, I used the texture mapping algorithm demonstrated by Lode. This was very easy to implement, which is why I used it, but I will swap it out later for a more efficient method as Lode uses a lot of floating point arithmetic which I am sure I can eliminate with the use of lookup tables.
I also modified the ray cast algorithm a little. Now, instead of returning the distance to a wall, the ray cast function instead returns a struct Slice object which is defined as below:
pub enum TextureCode {
	None,
	Wall(u8, i32, bool)
}

pub struct Slice {
	pub texture: TextureCode,
	pub distance: i32,
}

impl Slice {
	fn new(texture: TextureCode, distance: i32) -> Slice {
		Slice { texture, distance }
	}
}
While most other implementations will encode texture information for a wall by setting a numerical value in their map data (e.g. if the wall code is 1, draw the first texture), I have decided to take this approach because it will open the door to more interesting features later.
Slice stores the information about the texture to be drawn for a wall, and the distance between the player and the wall. Texture information includes a texture id, the column of the wall that was struck, and a boolean indicating whether the wall was struck from in front or behind. The final parameter mentioned is present so that we can flip textures when rendering them depending on whether we are facing the front or behind of a wall.
Using Slice gives me a lot of power. For example, I can have a different texture for the front or back of a wall. But more importantly, this structure will be key to implementing transparency. From tomorrow, instead of the ray cast function returning the first wall it hits, it will return a list of Slice objects sorted by distance from the camera. If a transparent section is found in a slice, then the render function will move on to the slice behind it and will start drawing there. This is precisely what I intend to get working tomorrow.
Other Happenings
While I was playing around with the newly textured engine, I noticed quite a lot of tearing in the walls as the camera spins around. This isn’t an issue with the ray cast implementation. Rather, this is a problem with how I am using the HTML 5 canvas. The bug isn’t game-breaking for now, so I’ll live with it while there are more important tasks on the horizon, but I will need to come back to this.
Conclusion
As I have said, while texturing is working, there are many aspects of it which could be implemented in a much more efficient manner. I plan to deal with some of these inefficiencies soon. However, for tomorrow my goal will be to implement transparency so I will be able to have see-through doors and windows. If I can get this working, then I may also add a feature whereby you can disable collision detection on certain walls. This will allow me to have a wall with a door frame that the user can pass through without needing to specifically implement doors. Hopefully all of this is coming tomorrow.
After that, I may turn my attention to textured walls and ceilings