
I Can See Right Through You
70 Days Until I Can Walk
Transparency works!
The implementation is more inefficient than I would like. Even so, the draw function isn’t significantly more complicated than it used to be, although there is a little more preprocessing involved.
Implementing Transparency
The below code excerpt is from the render function that is called from JavaScript. Not shown is some boilerplate code that sets up some variables to determine what angles the ray caster will sweep through etc. The buf variable is a reference to the canvas ImageData buffer, and sweep is the current column of the screen that is being drawn.
let slices = self.world.find_closest_intersect(origin_x, origin_y, angle);
if slices.len() <= 0 { continue; }
let mut parameters: Vec<ColumnRenderParameters> = Vec::new();
parameters.reserve(slices.len());

// for each slice, get a reference to its texture and figure out how
// it should be drawn
for slice in slices {
    let dist = fp::div(slice.distance, trig::fisheye_correction(sweep)).to_i32();
    let wall_height: i32 = trig::wall_height(dist);
    let y_min = std::cmp::max(0, (200 - wall_height) / 2);
    let y_max = std::cmp::min(200 - 1, y_min + wall_height);
    let step: f64 = consts::TEXTURE_HEIGHT as f64 / wall_height as f64;
    let raycast::TextureCode::Wall(code, texture_column, flipped) = slice.texture;
    let texture = self.textures.get(code, texture_column, flipped);
    let tex_pos: f64 = (y_min as f64 - consts::PROJECTION_PLANE_HEIGHT as f64 / 2.0 + wall_height as f64 / 2.0) * step;
    parameters.push(ColumnRenderParameters::new(texture, step, wall_height, tex_pos, y_min, y_max))
}

self.draw_wall_column(buf, sweep, &mut parameters);
For a single column of the screen, we perform ray casting using the updated ray cast function (currently misnamed find_closest_intersect). This returns a list of intersections (slices), their texture ids, and their distance from the point of origin.
After some checking to ensure that we have actually received something that needs to be drawn, we iterate over each slice and generate rendering information for each—how high will the wall be, what texture column should be used, etc. We push all of this data into a list which is sorted based on distance from the camera. Closest slices are first.
These render parameters are then passed into the draw_wall_column function.
fn draw_wall_column(&self, buf: &mut[u8], column: i32, parameters: &mut Vec<ColumnRenderParameters>) {
    let y_min = parameters[0].y_min;
    let y_max = parameters[0].y_max;

    for y in y_min..=y_max {
        let mut r: u8 = 0;
        let mut g: u8 = 0;
        let mut b: u8 = 0;
        let mut a: u8 = 0;

        let idx: usize = 4 * (column + y * consts::PROJECTION_PLANE_WIDTH) as usize;

        for slice in parameters.iter_mut() {
            if y < slice.y_min || y > slice.y_max { break; }
            let tex_y = (slice.tex_pos.clamp(0.0, 63.0) as usize) * 4;

            (r, g, b, a) = blend_colours(r, g, b, a, slice.texture[tex_y + 0], slice.texture[tex_y + 1], slice.texture[tex_y + 2], slice.texture[tex_y + 3]);

            if a >= 255 { break; }
        }

        for slice in parameters.iter_mut() {
            if y < slice.y_min || y > slice.y_max { break; }
            slice.step();
        }

        (buf[idx + 0], buf[idx + 1], buf[idx + 2], buf[idx + 3]) = blend_colours(r, g, b, a, buf[idx + 0], buf[idx + 1], buf[idx + 2], buf[idx + 3]);
    }
}
In this function, we take the first wall (and by extension the tallest wall) and use that to determine which indexes of the screen we will iterate over (y_min and y_max). We then iterate over each pixel in a vertical slice.
Because I don’t just want transparency to be a binary feature—a pixel is either opaque or transparent—we need to compute the final RGBa values of the pixel using alpha blending across the slices. We create some variables to hold this RGBa information and initialize everything to zero (a blank, totally transparent pixel). We then iterate over the slices, and for each one we blend its texture information into the pixel value. We do this either until the alpha value of the pixel is 255 (i.e. the pixel is now fully opaque, so none of the slices behind it are visable), or until we have exhausted all slices.
We will also terminate the loop if the current y value is above or below the min/max height of the wall represented by the slice. If a single slices is vertically out of bounds, then all slices behind it will be too.
In a really hacky turn, I have a second loop whose whole job is to advance the current texture pixel that should be drawn if the slice is visible at the next y coordinate. I hate this so much and will come up with a better approach soon.
Finally we blend the colour of the pixel with the colour currently in the screen buffer. At this point, that colour will be either the floor or the ceiling. So if the floor is visible through a tinted window, we will still render the floor, but its colour will be darkened slightly due to the window.
My implementation of alpha blending is shown below. This is very quick and dirty because I wanted to get to a working demo as quickly as possible. This function is a prime candidate for conversion to FPA, which I will probably do in the future.
fn alpha_blend(c1: f64, a1: f64, c2: f64, a2: f64, ao: f64) -> f64 {
    (c1 * a1 + c2 * a2 * (1.0 - a1)) / ao
}

fn blend_colours(r1: u8, g1: u8, b1: u8, a1: u8, r2:u8, g2:u8, b2:u8, a2:u8) -> (u8, u8, u8, u8) {
    let fa1 = a1 as f64 / 255.0;
    let fa2 = a2 as f64 / 255.0;
    let fao = alpha_blend(1.0, fa1, 1.0, fa2, 1.0);

    let r = alpha_blend(r1 as f64, fa1, r2 as f64, fa2, fao) as u8;
    let g = alpha_blend(g1 as f64, fa1, g2 as f64, fa2, fao) as u8;
    let b = alpha_blend(b1 as f64, fa1, b2 as f64, fa2, fao) as u8;
    let a = (255.0 * fao) as u8;

    (r, g, b, a)
}
Other Happenings
One thing I could do to make this a bit faster would be to generate a lookup table whose job is to give texture column coordinates based on distance to a wall. I did start the day trying to do this, but there does not seem to be a nice way to declare a global static array of vectors in Rust. This is probably a good thing, but it does scupper my plans. I’m going to keep this optimisation in mind, but I may need to rethink how it will work going forward.
I finished up coding a little early today, so I took some time to continue Tim McNamara’s course. At this stage, I don’t think it is what I’m looking for in a Rust course, so I won’t be following the upcoming weeks. Dropping this from my agenda will give me more time to work on my own writing, and do some more self-guided learning with Rust.
Conclusion
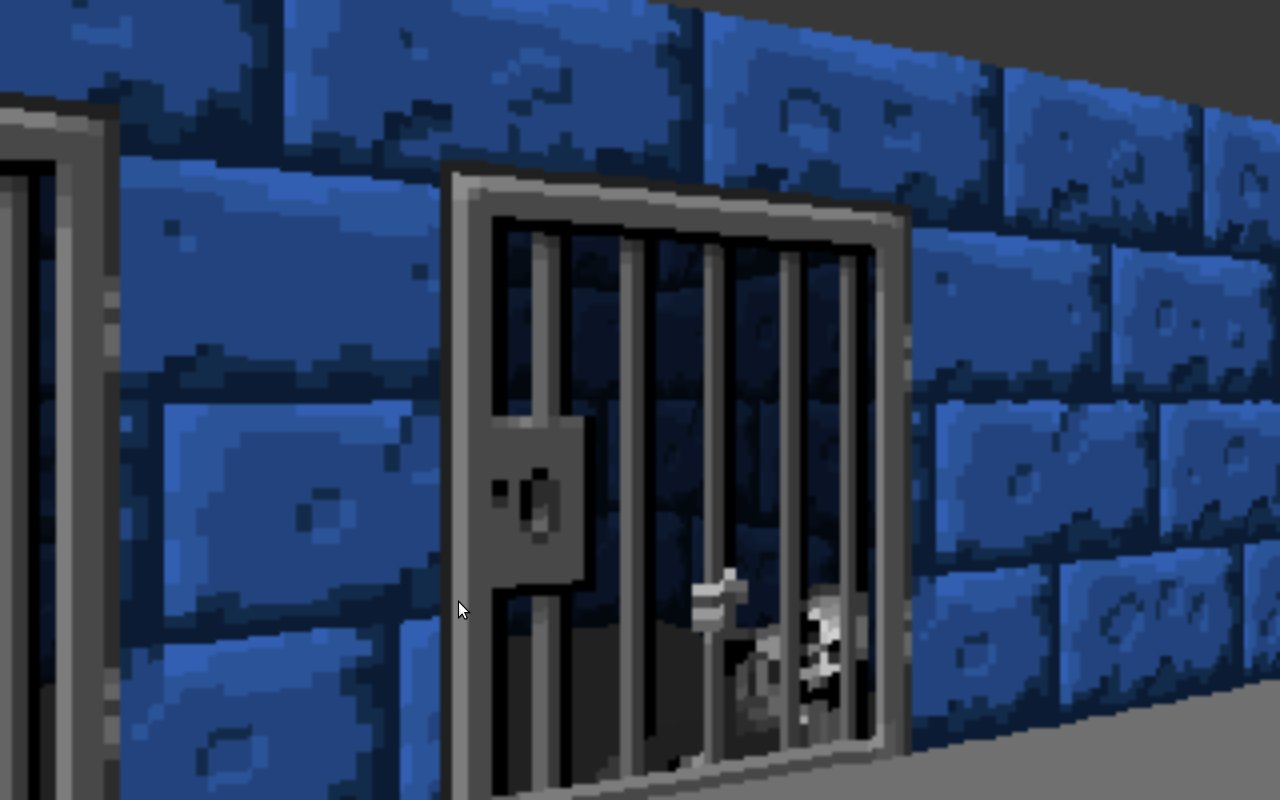
It’s down and dirty, but that’s transparency in all its glory. I feel like this adds a real sense of depth to the virtual word. For fun, I created some little cells along the back wall of the test map, similar to those seen in Wolfenstein, except I reduced the alpha channel of the pixels between the bars ever-so-slightly so that the player can actually see into a cell. I’m really happy with the effect. I think today is the first day I have looked at the engine and really thought it looked kinda good!
I might be pushing it a bit, given that tomorrow is Friday and I will spend the weekend writing instead of coding, but I’m going to go for floor and ceiling textures tomorrow. I have no idea how that’s going to work out, but fingers crossed that all goes well!